Stunning And Easy Drawing Of A Rose: A Beginner's Guide
Learning how to draw a rose doesn't have to be intimidating, especially when you break it down into simple steps. Whether you're a beginner or someone looking to refine your artistic skills, creating a stunning and easy drawing of a rose can be an enjoyable and rewarding experience. This guide will walk you through the basics, techniques, and tips to help you master this beautiful flower.
Roses are timeless symbols of beauty, love, and elegance. Capturing their essence in a drawing can seem challenging at first, but with the right approach, anyone can achieve impressive results. In this article, we'll explore various methods and tools that will make the process easier for beginners.
Our focus is on creating a stunning and easy drawing of a rose step by step. By the end of this guide, you'll not only have a better understanding of the anatomy of a rose but also gain confidence in your artistic abilities. Let's dive in!
Read also:Best Remoteiot Behind Router Raspberry Pi A Comprehensive Guide
Table of Contents
- Why Should You Learn to Draw Roses?
- Tools You Need for Drawing a Rose
- Understanding the Anatomy of a Rose
- Simple Steps to Draw a Rose
- Common Mistakes to Avoid
- Advanced Techniques for Stunning Roses
- Tips for Practicing Your Rose Drawing
- Sources of Inspiration for Drawing Roses
- Online Resources for Learning More
- Conclusion: Start Your Rose Drawing Journey Today
Why Should You Learn to Draw Roses?
Roses are one of the most iconic flowers in art and culture, making them a popular subject for artists of all levels. Learning how to draw a rose offers numerous benefits beyond just creating beautiful artwork. It enhances your observational skills, improves hand-eye coordination, and boosts creativity. Additionally, mastering the art of drawing roses allows you to express emotions and tell stories through your creations.
For beginners, roses are an excellent starting point because they combine simplicity with complexity. Their layered petals provide opportunities to practice shading, texture, and form, while their overall structure remains approachable. By dedicating time to learning how to draw a rose, you'll build a strong foundation for exploring other subjects in your artistic journey.
Tools You Need for Drawing a Rose
Before diving into the drawing process, it's essential to gather the right tools. Here's a list of items you'll need:
- Pencils (HB, 2B, 4B, 6B)
- Eraser (kneaded and regular)
- Sketchbook or drawing paper
- Blending tools (tortillons or blending stumps)
- Reference images of roses
Having the correct materials ensures a smoother drawing experience and helps you achieve better results. Investing in quality tools can significantly impact your artwork, so consider upgrading as you progress.
Understanding the Anatomy of a Rose
To draw a realistic rose, it's crucial to understand its anatomy. A rose consists of several key parts:
- Petals: The layered, colorful parts of the flower.
- Stem: The long, slender part supporting the flower.
- Leaves: Arranged in groups of three or five, with serrated edges.
- Thorns: Sharp protrusions along the stem.
By studying these components, you'll gain insight into how they interact and contribute to the overall appearance of the rose. This knowledge will help you create more accurate and detailed drawings.
Read also:Madi Ruve Biography A Detailed Exploration Of Her Life And Achievements
Key Features of a Rose
When drawing a rose, pay attention to its unique characteristics:
- The overlapping petals create depth and dimension.
- The stem's texture and thorns add visual interest.
- The leaves' arrangement follows a specific pattern.
Understanding these features will enhance the realism of your drawings.
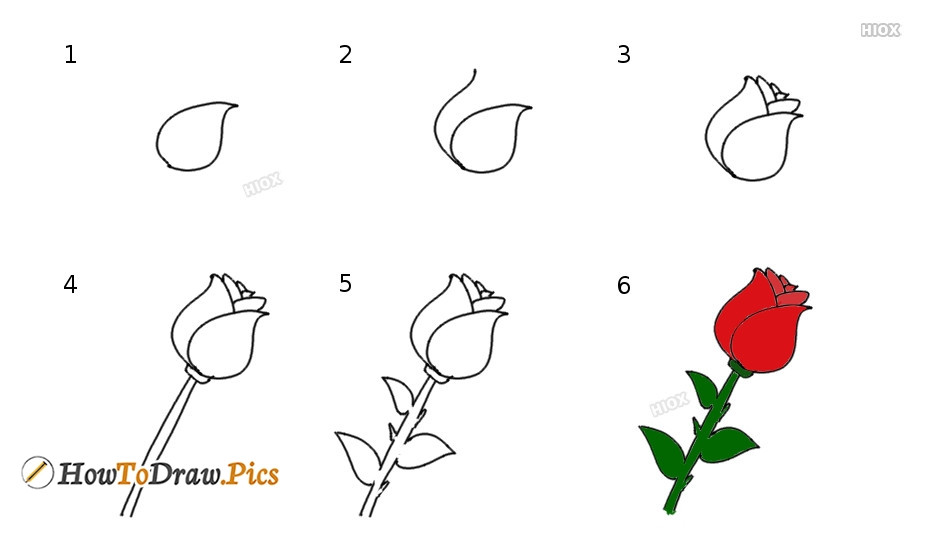
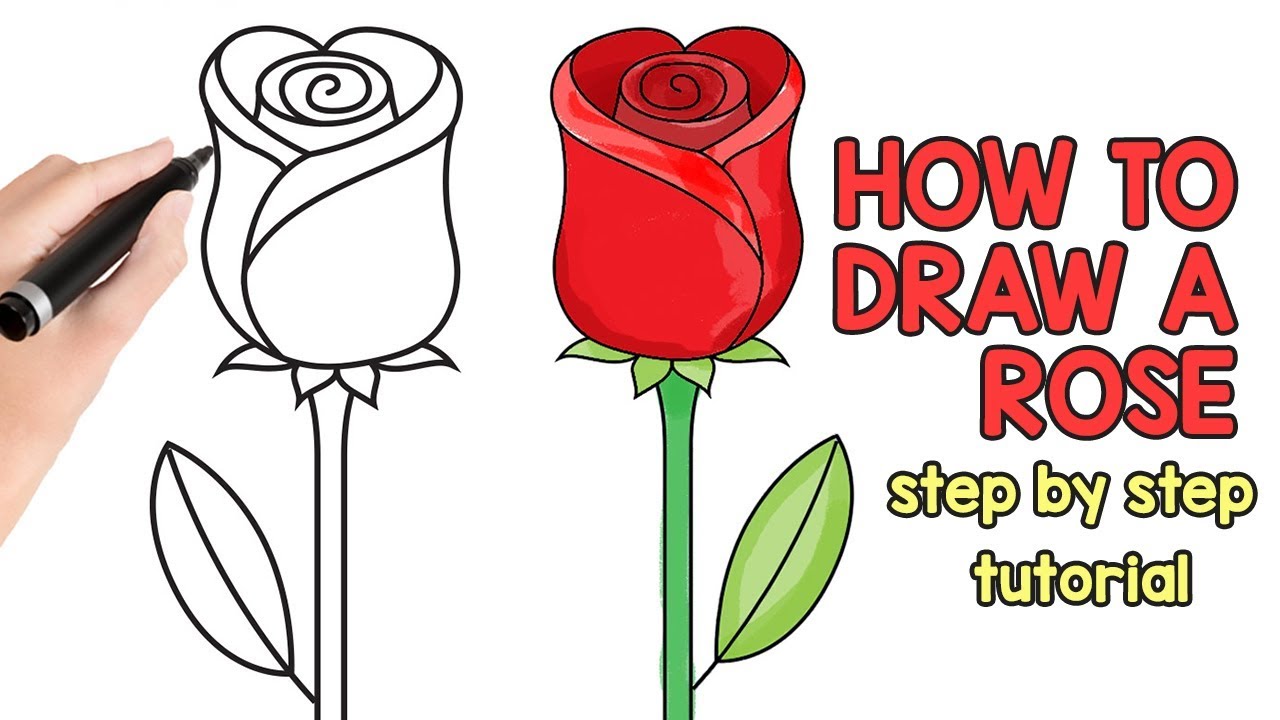
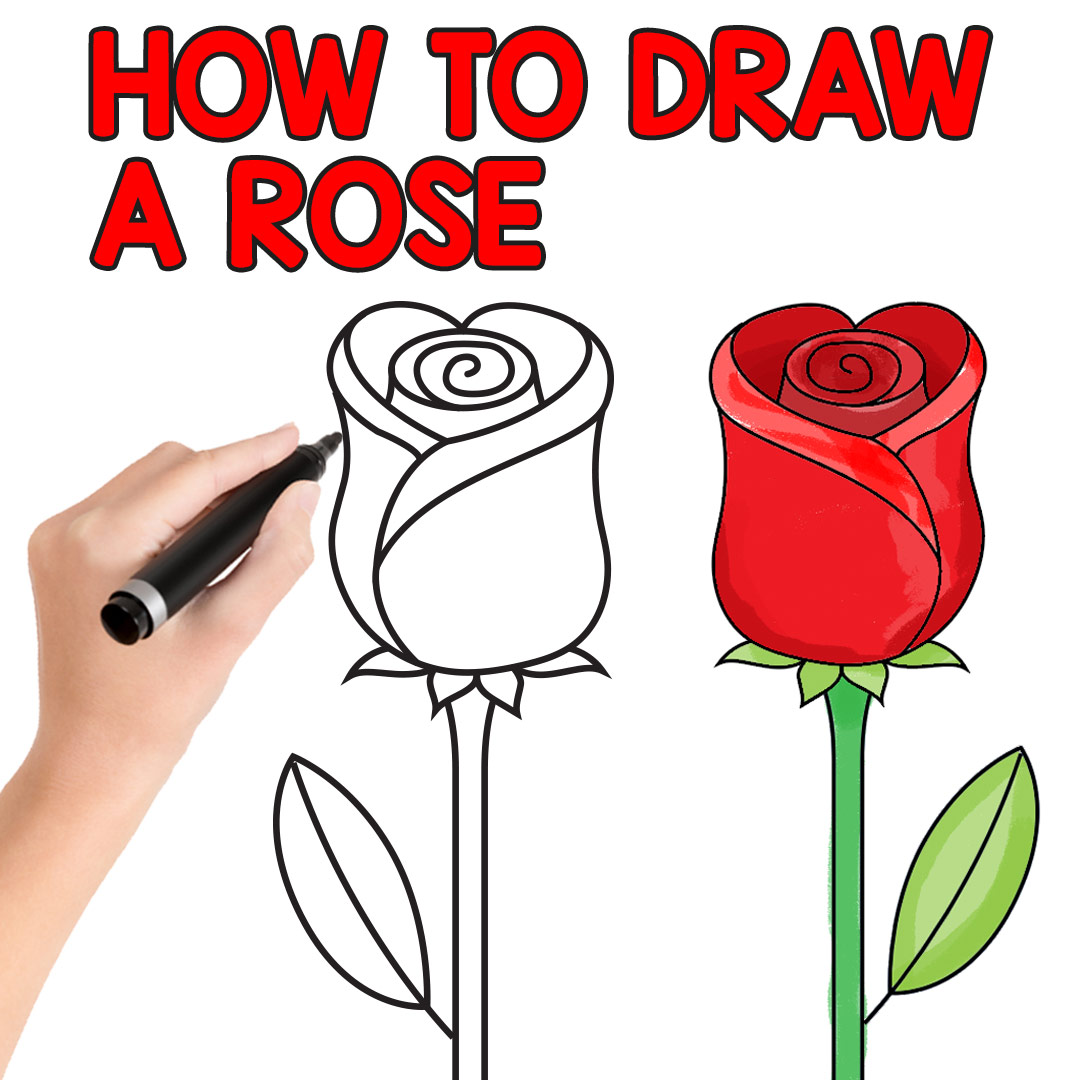
Simple Steps to Draw a Rose
Now that you're familiar with the basics, let's explore a step-by-step guide to drawing a stunning and easy rose:
Step 1: Sketch the Basic Shape
Start by lightly sketching an oval or teardrop shape to represent the center of the rose. This will serve as the foundation for your drawing.
Step 2: Add Petal Layers
Draw curved lines around the center to form the outer petals. Remember that petals overlap, creating a layered effect. Keep your lines light and adjust as needed.
Step 3: Define the Stem and Leaves
Extend a straight line downward from the base of the rose to create the stem. Add leaves on either side, ensuring they follow the natural arrangement of three or five per group.
Step 4: Refine Details
Once the basic structure is in place, refine the details. Define the edges of the petals, add thorns to the stem, and include veins in the leaves.
Step 5: Shade and Add Texture
Use varying pencil pressures to add shading and texture. Focus on areas where light and shadow meet to create depth and dimension.
Common Mistakes to Avoid
Even experienced artists make mistakes, but being aware of them can help you avoid pitfalls. Here are some common errors to watch out for:
- Overlapping petals too uniformly, which can make the rose look flat.
- Ignoring the natural curves of the stem and leaves.
- Forgetting to add texture to the petals and stem.
- Not considering light sources when shading.
By keeping these tips in mind, you'll be able to improve your rose drawings significantly.
Advanced Techniques for Stunning Roses
Once you've mastered the basics, you can explore advanced techniques to elevate your rose drawings:
- Blending: Use tortillons or blending stumps to smooth out shading and create seamless transitions.
- Layering: Build up layers of graphite or colored pencils to achieve rich, vibrant colors.
- Highlights: Add highlights to petals and leaves using an eraser for a more dynamic effect.
Experimenting with these techniques will allow you to create more lifelike and visually appealing roses.
Using Color in Your Rose Drawings
While black and white drawings are stunning, adding color can bring your roses to life. Consider using colored pencils, watercolors, or digital tools to experiment with different hues and shading techniques.
Tips for Practicing Your Rose Drawing
Practice is key to improving your skills. Here are some tips to help you make the most of your practice sessions:
- Set aside dedicated time each day for drawing.
- Study reference images to understand different rose varieties.
- Experiment with various tools and techniques to find what works best for you.
- Join online communities or local art groups for feedback and inspiration.
Consistency and perseverance are vital to becoming a skilled artist. Keep practicing, and you'll see noticeable improvements over time.
Sources of Inspiration for Drawing Roses
Seeking inspiration is an important part of the creative process. Here are some sources to spark your imagination:
- Art Books: Explore books dedicated to floral art for guidance and ideas.
- Online Galleries: Websites like Pinterest and DeviantArt showcase a wide range of rose drawings.
- Real-Life Observation: Visit gardens or flower shops to study roses up close.
By drawing inspiration from various sources, you'll expand your artistic horizons and develop your unique style.
Online Resources for Learning More
There are countless online resources available to help you improve your rose drawing skills:
- YouTube Tutorials: Many artists share step-by-step videos to guide beginners.
- Online Courses: Platforms like Udemy and Skillshare offer in-depth lessons on floral art.
- Art Communities: Join forums and social media groups to connect with fellow artists.
Utilizing these resources can provide valuable insights and support as you continue your artistic journey.
Conclusion: Start Your Rose Drawing Journey Today
In conclusion, learning how to create a stunning and easy drawing of a rose is an achievable goal for any beginner. By following this guide, you'll gain the knowledge and skills necessary to produce beautiful and realistic rose drawings. Remember to practice regularly, seek inspiration, and embrace the artistic process.
Now it's your turn! Grab your pencils and start drawing. Share your creations with the world, and don't hesitate to leave a comment or question below. For more art tips and tutorials, explore our other articles and continue honing your craft. Happy drawing!
