Securely Connect Remote IoT P2P SSH Raspberry Pi Free: A Comprehensive Guide
In the era of interconnected devices, securely connecting remote IoT devices has become a critical aspect of modern technology. Whether you're managing a smart home system, monitoring industrial equipment, or setting up a personal project, ensuring secure connections is paramount. This guide will walk you through the process of securely connecting remote IoT devices using P2P SSH on a Raspberry Pi, all for free.
With the increasing reliance on Internet of Things (IoT) devices, security concerns have grown exponentially. Hackers are constantly finding new ways to exploit vulnerabilities in IoT networks. Therefore, establishing a secure and encrypted connection between devices is essential to protect sensitive data and maintain privacy.
This article will provide a step-by-step guide to help you set up a secure connection for your IoT devices using SSH and Raspberry Pi. We'll cover everything from understanding the basics of IoT security to configuring your Raspberry Pi for P2P SSH connections, ensuring your devices remain protected at all times.
Read also:Melissa Oneil Height A Comprehensive Look At The Rising Star
Table of Contents
- Understanding IoT Security
- Raspberry Pi Overview
- Setting Up SSH
- P2P SSH Connection
- Securing Your Connection
- Troubleshooting Common Issues
- Advanced Security Tips
- Frequently Asked Questions
- Use Cases and Applications
- Conclusion
Understanding IoT Security
IoT security refers to the technologies and practices used to protect IoT devices and networks from cyber threats. As more devices become connected, the potential for security breaches increases. This section will delve into the importance of IoT security and the risks associated with insecure connections.
Why IoT Security Matters
IoT devices often handle sensitive data, from personal information to critical infrastructure controls. A breach in IoT security can lead to data theft, financial loss, and even physical harm. Here are some reasons why IoT security is crucial:
- Data Protection: Prevent unauthorized access to sensitive information.
- Device Integrity: Ensure devices function as intended without interference.
- Network Security: Protect the entire network from being compromised through a single vulnerable device.
Risks of Insecure Connections
Insecure IoT connections can expose devices to various threats, including:
- Malware infections.
- Data breaches.
- Denial-of-service (DoS) attacks.
- Unauthorized access to personal or corporate networks.
Raspberry Pi Overview
The Raspberry Pi is a versatile and affordable single-board computer widely used in IoT projects. Its small size, low power consumption, and extensive community support make it an ideal platform for setting up secure IoT connections.
Key Features of Raspberry Pi
Raspberry Pi offers several features that make it suitable for IoT applications:
Read also:Bubblesandbbly A Comprehensive Guide To Understanding And Exploring
- Compact and lightweight design.
- Support for multiple operating systems, including Raspbian and Ubuntu.
- GPIO pins for interfacing with external devices.
- Built-in Wi-Fi and Bluetooth capabilities.
Choosing the Right Raspberry Pi Model
When selecting a Raspberry Pi for your IoT project, consider factors such as processing power, memory, and connectivity options. Popular models include:
- Raspberry Pi 4 Model B.
- Raspberry Pi Zero W.
- Raspberry Pi 3 Model B+.
Setting Up SSH
Secure Shell (SSH) is a protocol used to securely connect to remote devices. Setting up SSH on your Raspberry Pi is a fundamental step in establishing a secure IoT connection.
Enabling SSH on Raspberry Pi
To enable SSH on your Raspberry Pi, follow these steps:
- Insert the microSD card into your computer.
- Download and install the Raspberry Pi Imager tool.
- Write the Raspbian OS image to the microSD card.
- Create an empty file named "ssh" (without any extension) in the boot partition of the microSD card.
- Insert the microSD card into your Raspberry Pi and power it on.
Connecting via SSH
Once SSH is enabled, you can connect to your Raspberry Pi from another device using an SSH client such as PuTTY or Terminal. Use the following command:
ssh pi@raspberrypi.local
The default username is "pi" and the password is "raspberry". Be sure to change the default password after your first login for added security.
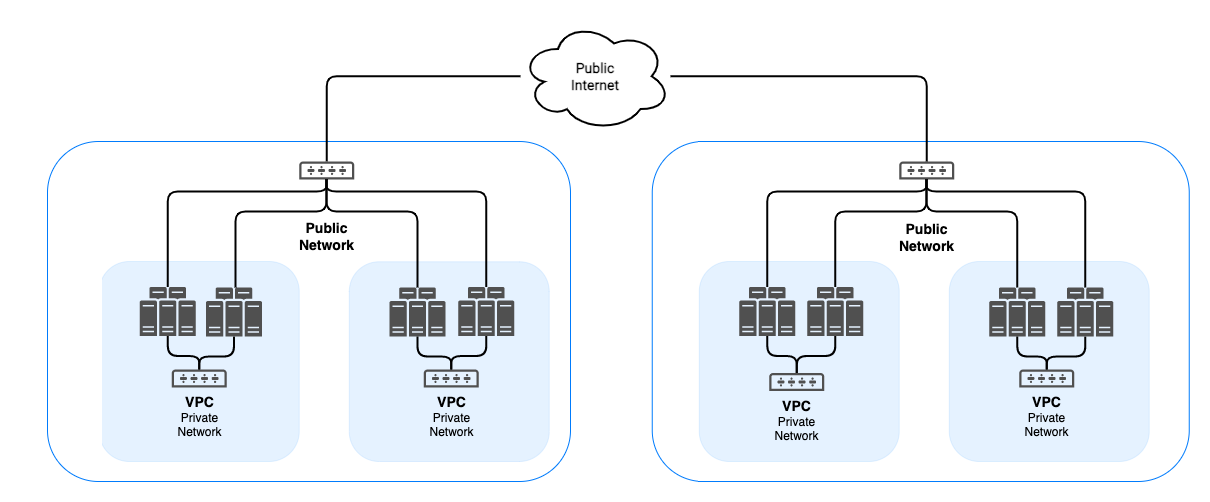
P2P SSH Connection
Peer-to-Peer (P2P) SSH connections allow devices to communicate directly without relying on a central server. This section will explain how to set up a P2P SSH connection for your IoT devices.
Benefits of P2P SSH
P2P SSH offers several advantages, including:
- Reduced reliance on third-party servers.
- Improved security through direct device communication.
- Lower latency and faster data transfer.
Configuring P2P SSH
To configure a P2P SSH connection, follow these steps:
- Set up a static IP address for your Raspberry Pi.
- Install and configure an SSH server on both devices.
- Use port forwarding to allow external access to your devices.
- Test the connection by initiating an SSH session from one device to another.
Securing Your Connection
While SSH provides a secure communication channel, additional measures can enhance the security of your IoT connections.
Best Practices for IoT Security
Implement the following best practices to secure your IoT devices:
- Use strong and unique passwords for all devices.
- Enable two-factor authentication (2FA) whenever possible.
- Regularly update firmware and software to patch vulnerabilities.
- Limit access to devices to authorized users only.
Encrypting Data Transfers
Encrypting data transfers ensures that even if a connection is intercepted, the data remains unreadable to unauthorized parties. Use protocols such as TLS or SSL for secure data transmission.
Troubleshooting Common Issues
Even with careful setup, issues can arise when configuring IoT connections. This section will address common problems and provide solutions.
Connection Errors
If you encounter connection errors, check the following:
- Ensure the Raspberry Pi is powered on and connected to the network.
- Verify the IP address and port number are correct.
- Check firewall settings to ensure they are not blocking the connection.
Performance Issues
Slow performance can be caused by several factors, including:
- Insufficient bandwidth.
- Outdated firmware or software.
- Excessive network traffic.
Advanced Security Tips
For users seeking an extra layer of security, consider implementing the following advanced techniques:
Using SSH Keys
SSH keys provide a more secure alternative to password-based authentication. Generate an SSH key pair and configure your devices to use key-based authentication.
Network Segmentation
Segmenting your network isolates IoT devices from other devices, reducing the risk of a breach spreading to the entire network.
Frequently Asked Questions
Q: Can I use SSH for free?
A: Yes, SSH is a free and open-source protocol available on most operating systems.
Q: Is P2P SSH suitable for all IoT devices?
A: While P2P SSH is effective for many IoT applications, some devices may require additional configuration or hardware support.
Q: How often should I update my Raspberry Pi?
A: It's recommended to update your Raspberry Pi at least once a month to ensure you have the latest security patches and software improvements.
Use Cases and Applications
Securely connecting remote IoT devices using P2P SSH on a Raspberry Pi has numerous applications across various industries:
Smart Home Automation
Control smart home devices such as lights, thermostats, and security systems from anywhere in the world.
Industrial Monitoring
Monitor and manage industrial equipment in real-time, ensuring optimal performance and reducing downtime.
Healthcare IoT
Securely transmit patient data from wearable devices to healthcare providers, improving diagnosis and treatment.
Conclusion
Securing remote IoT connections using P2P SSH on a Raspberry Pi is an essential skill for anyone working with interconnected devices. By following the steps outlined in this guide, you can protect your devices and data from cyber threats while maintaining ease of access and functionality.
We encourage you to share this article with others who may benefit from it and leave a comment below with any questions or feedback. For more in-depth guides and tutorials, explore our other articles on IoT security and Raspberry Pi projects.


